
Whether you are remodeling a room or want to upgrade an existing drawer in your home, learning how to retrofit a Docking Drawer outlet into a drawer is a simple process that can be completed in just seven easy steps. But, before you start your project, it is important to understand what makes Docking Drawer outlets the smart, simple, and safe solution for your home.
Why Use Docking Drawer for Your In-Drawer Outlet Installation?
For any installation project, it is important that the process is simple to follow and can work for a variety of applications. That is why our outlets can be installed in any type of drawer, including shallow, tall, narrow, and vertical drawers. We keep safety top-of-mind with a built-in interlocking thermostat that cuts power if the surrounding temperature exceeds 120°F. Not to mention, Docking Drawer outlets are the only ETL Listed solution on the market for in-drawer power, which means every outlet has passed rigorous safety inspections and that the ultimate responsibility is on us as the manufacturer. Our outlets are intentionally designed for use inside the drawer, featuring cable management arms which guide and protect the power cord to ensure no drawer functionality is lost and that the outlet will endure through time.
 Before and after a kitchen retrofit Docking Drawer outlet installation.
So, are you ready to get started? Here are the seven simple steps to retrofit a Docking Drawer outlet into your existing drawer:
Step 1: Identify your drawer type to select the appropriate outlet
Not sure what type of drawer you have? Don’t worry, this step is much simpler than it seems. Your drawer most likely falls into one of four drawer categories:
Shallow Drawer: these drawers are often found in kitchens, closets, offices, side tables, entryway tables, and retail projects. The most popular shallow drawer outlets include:
Tall Drawer: These drawers are typically found in bathroom vanities and in drawers with above-glide mounting. The most popular tall drawer outlets include:
Narrow Drawer: Most often found in bathroom vanities and drawers as narrow as 9” with over-glide mounting. Outlet installation for narrow drawers may require the use of an installation technique, like the creation of a channel in the cabinet sidewall, to give the cable management arms room to expand and contract. The most popular outlet for narrow drawers is the:
Vertical Drawer: Most often found in bathroom vanities and kitchen pull-outs. Blade Series outlets can easily be rotated for vertical installations, and our most popular vertical drawer outlet is the:
Compare the chart below to your drawer measurements, examine more measurements in our spec book, or take the Docking Drawer Outlet Selector Quiz to determine how to best categorize your drawer.

Chart with specifications for categorizing a drawer for a Docking Drawer outlet retrofit installation.
Step 2: Gather the basic tools needed for your retrofit outlet installation
Once you have ordered the ideal outlet for your drawer, you will receive a package with your Docking Drawer outlet, which includes the cover plate in the finish of your choice, detailed specification instructions - even all the screws needed for mounting.
There are a few basic tools you will need to gather in preparation for the installation. These tools include*:
- Tape: you will need tape to attach the template to the back of the drawer.
- Punch, Nail Setter, Nail or Pencil: you can use any of these tools to mark the edge of the cutout on the back of the drawer box.
- Drill & Jigsaw or Oscillating Multi-tool: these are the tools you will use to cut through the template and into your drawer.
- Screwdriver: once your outlet is installed into the drawer cutout, you will need a screwdriver to attach your cover plate to the outlet.
*If you are choosing to use a router for your installation, please see Step 3 for more information.
 (Left) Drill and jigsaw used to retrofit a Docking Drawer outlet into an existing drawer. (Right) Oscillating multi-tool used to retrofit a Docking Drawer outlet into an existing drawer.
Step 3: Follow the included template to make the drawer cutout
Within the detailed instructions that come with your outlet, you will see a cutout template that you will use to make the drawer cutout where the outlet will be installed. Should you need additional cutout templates, you can find those templates here. Remember, when printing the cutout templates, make sure your printer is set to print at 100% to ensure measurement accuracy.

Cutout template for a retrofit installation of a Blade Series outlet.
Once the template has been printed, there are three different ways you can create a Docking Drawer outlet cutout:
- Jigsaw: this is the tried and true method that we have included in our installation manuals. Simply drill holes in the corners of the cutout template, then insert the jigsaw blade into the hole and follow the line on the template connecting each of the holes.
- Oscillating Multi-Tool: this is the preferred method for cutting into metal drawer boxes, and it allows you to skip the drill and do the job with just one power tool. Simply follow the outline of the cutout template with your multi-tool, and you’re done!
- Router: this method provides expert-level precision, and involves using the provided cutout templates to create a guide/jig to make the perfect clean cut into your drawer. If you need additional guidance for this method, please watch this step-by-step video guide.
Step 4: Insert the outlet into the cutout
Once the drawer cutout is complete, slide your Docking Drawer outlet into the space and secure the outlet with four of the Philips head receptacle mounting screws provided in your package.
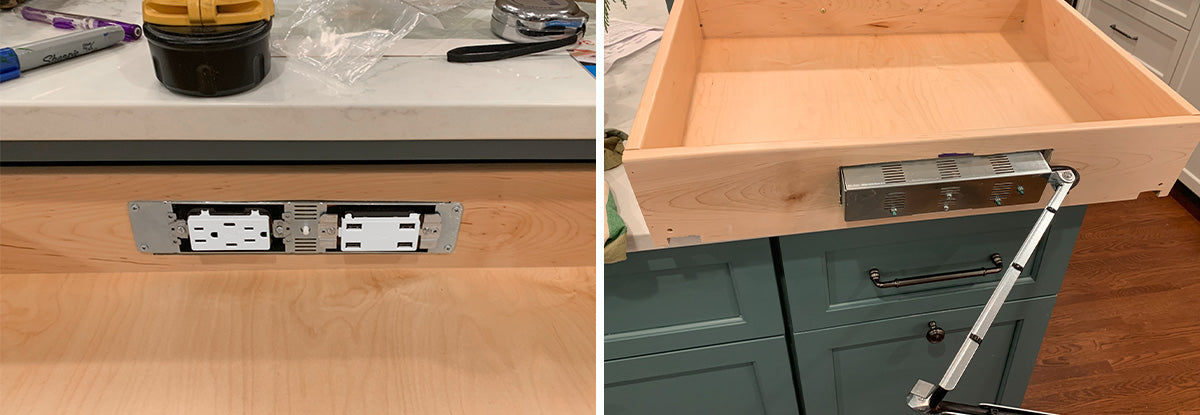 (Left) View of the retrofitted outlet from the inside of the drawer. (Right) View of the retrofitted outlet from the back of the drawer, showing the cable management arms.
Step 5: Attach the cable management arms to the back of the cabinet wall
Before attaching the cable management arms to the back of the cabinet wall, it is important to make sure the arms are square and parallel. Position the rear bracket so that it is parallel with the top arm and ensure that the arms are centered to prevent the arms from hitting the cabinet wall behind the drawer box. Watch the video below for step-by-step instructions on how to ensure the cable management arms are aligned:
Then, with the drawer mostly closed, mark the position of the rear mounting bracket and secure it to the cabinet wall with the three Philips head rear mounting screws provided in your package.

A retrofit outlet installation showing a cable management arm secured to the cabinet wall.
Step 6: Use included screws to attach the cover plate
Now that the outlet is fully installed, the next step is to screw on your metal cover plate. Blade outlets come with two flat head cover screws and Blade Duo outlets come with four flat head cover screws to secure your cover plate to the outlet.

Docking Drawer Blade Duo Series outlet complete with a white cover plate.
Step 7: Plug the outlet in
The final step is to plug your outlet in! Every in-drawer outlet comes fully corded and ready to plug into the power source behind the cabinet wall. If there is not a power outlet behind the cabinet wall, one can easily be installed by an electrician or an electrically savvy homeowner in less than one hour. If you’d like to learn more about running power to an outlet, check out this video on where to best locate your in-cabinet power, and this video which explains how to run power from a nearby outlet.

Docking Drawer Blade Series outlet is installed and powered by an in-cabinet outlet.
Congratulations, you have successfully learned how to retrofit a Docking Drawer outlet into your existing drawer!
Now, you can enjoy the convenience and simplicity of powering your devices directly in your drawer, whether for a hair dryer storage drawer, a kitchen charging drawer, or any other in-drawer outlet application, like these top trending applications.
Bonus step: Earn up to $500!
Once you have completed your project, we would love to see the result! Send project photos and details through our content-buying program for the chance to earn up to $500.
